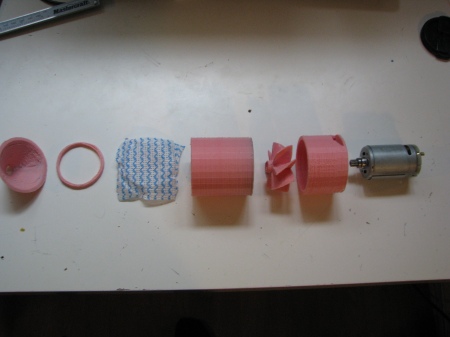
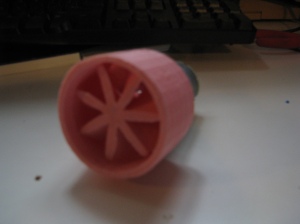
Hacklab was getting dusty and the roombas couldn’t get in the corners. So I designed a printable hand-held vacuum cleaner. It works, for some definition of works.
What you need
- A 3D Printer
- A DC motor
- Tape
- Filter (some cloth; see later)
- Power Supply
Assembly
Step 1: Print 3D printable parts (get them from github/thingiverse/RepRap Wiki) and collect other necessary materials (refer to part list).
Step 2: Attach motor to impeller chamber. (You may need to redesign impeller_chamer.scad and impeller.scad for your motor.)
 Step 3: Attach impeller to motor (tight fitted).
Step 4: Insert filter and filter grip into bin. My best results have been with filters made out of commodity sink towels/cheese cloth (double layered). Originally I was using a bounce sheet (the things that go in your drier with clothing) but a piece of solder shot through that and came out the exhaust which wasn’t terribly safe.
Step 5: Tape bin to impeller chamber. Be aware that air escaping is an issue.
Step 6: Attach nozzle to bin.
Step 7: Hook up to a power supply, test, and enjoy! I upload a youtube video of some pepper getting sucked up here (thanks to Norman for filming!).
Tags: 3d printing, DIY


March 23, 2011 at 09:53 |
This is something that really makes me smile 🙂
I was planning on making an open source Roomba, or at least the replacement parts and slowly assimilate it to become fully open source. This is a great approach to even print out the vacuum. I was thinking I would use an existing handheld tool for the motor and convert it to robotic vacuum, but this shows that we could print all of it (except the motors).
Nice that you openSCADed it.
March 23, 2011 at 14:17 |
Thanks 😉
March 23, 2011 at 17:39 |
It may help if you have the collection bin to the side of the impeller instead of behind it. Impellers like to fling stuff outward not inline. Have a look at an impeller based water pump to see how they do it.
P.s. I have a mini mushroom shaped vacuum from china and its impeller flings outward.
March 23, 2011 at 17:43 |
Oh and my mini vacuum lets the dirt go through the impeller and then traps the dirt with a filter. So it pushes the dirt and air through the filter, it does not try and pull the air through the filter to capture the dirt.
http://www.google.ca/images?hl=en&q=mini%20mushroom%20vacuum&um=1&ie=UTF-8&source=og&sa=N&tab=wi&biw=1066&bih=509
March 23, 2011 at 21:37 |
Like the posters above said: get a radial fan instead of the axial thing you have now. A this small size, a radial fan offers more sucktion/efficiency per unit of power.
Instead of a filter that gets clogged, you might try a cyclonic action separator, but I would not know how to lay that out that you still have something useable as a vacuum cleaner.
March 25, 2011 at 21:03 |
I tried printing a radial fan a few months ago (there’s one on thingiverse) and spinning it up to a few thousand rpm but it didn’t get very good suction.
Is the housing crucial to a radial fan if you are using it for suction (through the hole in the middle)? I figured that was only to control the exhaust but I’m not exactly an expert here.
fan design by luck and intuition, what could possibly go wrong? 😛
March 25, 2011 at 22:15 |
> fan design by luck and intuition, what could possibly go wrong? 😛
Well, that’s what I’ve been doing. I just tried a few dozen different fans. 😉
For the fan design in the vacuum cleaner, it is necessary to have the housing or you loose a lot of the pressure to the sides, but if you add a horizontal curve to the blades, you can remove the need. This is what I did with the HMS Free Byron’s propeller.
September 26, 2012 at 19:35 |
Cyclonic action seperator. Take it from JD himself…http://media.dyson.com/downloads/JDF/Build_your_own_cyclone.pdf
April 5, 2011 at 15:39 |
The rotor/impeller, whether you keep the current axial flow design or switch to radial flow, will be significantly more effective if you add a matched stator/diffuser; some vacuum cleaner designs use several pairs of rotors and stators in series on a common motor shaft. A properly designed diffuser (and impeller) should cause the air, as much as possible, to flow only in the direction that is actually useful, i.e. from intake to exhaust. The equations to optimise a radial design to do this, for low Mach numbers, are two-dimensional and relatively easy to do by hand; axial flow is a lot trickier (this is one reason why radial compressors were used on most of the early jet engines, though the Germans did have axial-flow models working pretty early on), and simply cries out for a CFD solution.
On its own, a propeller will waste a significant amount of input power giving a useless lateral component to the flow; i.e. just spinning it around inside the housing without sending it anywhere or, worse, allowing it to carry away much unused energy in this lateral momentum. A diffuser can redirect the lateral kinetic energy back into a useful direction and/or convert it to additional static pressure.
September 14, 2011 at 15:54 |
HAHA sweet handvac! Let us know when you go in business and we will sell them on our website!
October 3, 2011 at 17:05 |
[…] vacuum cleaner went in a sock: Vacuum ready for transport to Maker […]
March 28, 2012 at 10:41 |
That is cool. I never knew you could build your own vacuum. But where do I find a 3d printer now?
July 6, 2012 at 17:24 |
[…] he writes articles about how to print things you wouldn’t expect, like camera lenses or vacuum cleaners.In the San Francisco hostel, residents tend to be more diverse by age and occupation. Some are […]
August 13, 2012 at 10:57 |
[…] Instead of throwing it away, or searching for weeks or months on end for a non-existant spare part, I can make a replacement part. Instantly. So cheap it is almost free (just a few cents). I could give my nephew a toy for […]
February 20, 2013 at 11:47 |
where is the dust collected and how do you empty it?
August 18, 2013 at 23:11 |
This is so cool. I can see a complete open source printable vacuum coming soon.